Patience: The absolute number one quality for a fossil preparator is patience. Never hurry, always take your time. The preparation process is very time consuming and repetitive work. It can take hours to prepare a small simple fossil, a complex one can take days, weeks or even months.
Superglue: When you have two pieces that perfectly fit together then super glue is the best you can use. This often is the case with a fresh crack, that happens in the field or while prepping. When both sides are clean just put a little superglue on one side and put the two pieces together, wait a couple of seconds and you´re done.
The superglue I use is based on cyanoacrylate. This kind of glue is solvable. This is useful when you made a mistake and the pieces are not perfectly put together but note that that you probably have to submerge the crack completely in acetone.
The glue reacts with water, and water is also in the air. So once opened, superglue does not last very long. Keep it in a cool place, that will extend its lifetime.
ParaloidB72: Most fossils are very fragile. To strengthen the structure, you need an adhesive that really penetrates small cracks. For this I use Paraloid. Paraloid is sold in ready to use liquids and also as grain. I prefer the latter so I can control the viscosity.
To make your own Paraloid you have to dissolve it in acetone. Pour the correct amount of acetone in a glass jar. Make a little linen pouch or use a t-sac. Put the correct amount of grains in the pouch or t-sac. Hang the pouch or t-sac in the glass jar, make sure it does not touch the bottom and close the jar with a lid. The grains slowly dissolve in the acetone, wait until all the grains are dissolved.
Warning: acetone is very flammable, and not very healthy. Be sure that the room is well ventilated and work safely.
I usually prepare different concentrations: a 5% concentration: 100 ml acetone and 5 grams of Paraloid grains and a 10% concentration: 100 ml acetone and 10 grams of Paraloid grains. Sometimes I also use a 25% or even 50% concentration. These I only prepare when needed and I use it as glue only because it does not penetrate very well anymore. The 5% and sometimes the 10% liquid is used to protect the fossil against dust, moist etc. Just cover the outside of the fossil with a thin layer. If too much Paraloid is added on the outside of the fossil it might get too shiny. Remove the abundant Paraloid with acetone.
Dental Tools: One of the first prepping task in the lab is removing the matrix, all the dirt that still sticks to the fossil. You can use any tool that is available for this job. With smaller fossils, you should use smaller tools. Dental tools are a good choice here.
Dental tools come in all kinds of shapes. With sharp points, with broader tips. A disadvantage of these tools is that they wear out fast. A tool with just a straight point can easily be sharpened, one with a special tip loses its function. My experience is that even the more expensive ones, used by dentists, wear out fast. Because of this I use these tools sparsely and only for working in hard-to-reach spots like the inside of a hollow bone.
Exacto knife: This is one of my favourite tools when it comes to delicate work. You can choose the shape of the blade. I prefer a straight one or a slightly curved one. With a very sharp blade you can really cut off the matrix in very thin layers. When working on teeth, an airscribe or other pneumatic or electric tool is often too aggressive. Then working under a magnifying lamp or microscope with an exacto knife gives me more control. It takes more time but gives the best result and with a minimum of risk of damaging the fossil.
Needles and pins: Other precision tools I use are needles and pins. The problem with smaller pins is that it is hard to get a good grip on.
I overcame this disadvantage with a hand drill tool used for model building. This tool can handle different sizes of drill which makes it also handy for different sizes of needles and pins. When using a pin, you'll have to cut the head off. I also use this for very delicate work, for example when working on fish fossils from the green river formation. These fossils are so fragile you cannot use power tools. Another advantage is if they wear out, and they do, they are very cheap to replace.
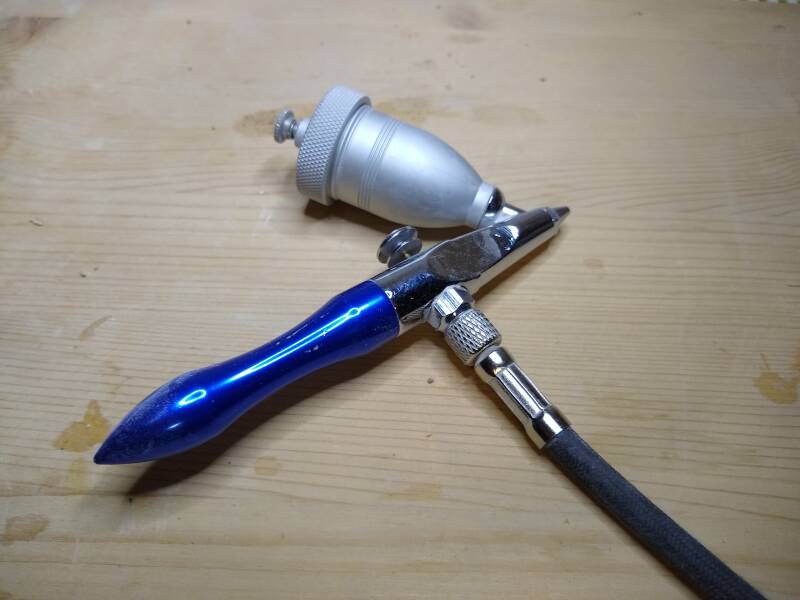
Sandblasting: When removing the last layer and particles of matrix on your fossil you should be very careful. You don't want to scratch the fossil; you just want to remove the matrix and not damage the fossil. For small and delicate parts I use a small sandblaster, that again is normally used for model building.
This is an affordable tool; you can buy it for about 20€. Because it has such a small reservoir is only suitable for small fossils. I once used it on a hadrosaur tail vertebra, with a diameter of about 10 cm. It still works but refilling the content cup takes up a lot of the time. On the other hand, because it is so small it works good for delicate surfaces. You will need a compressor to operate it. This tool does not use a lot of air so a small compressor would do. If you think fossil preparation is really something you are going to do a lot and you want to work on bigger fossils too, then I advise to buy a bigger compressor for operating other tools that are used for fossil preparation.
Actually, sandblasting is not the correct word. We don't use sand, as abrasive we use baking soda. So sodablasting would be a better name. Baking soda is milder, it will not damage the fossil as quick as any 'normal' blasting material, but you still have to be careful. Baking soda is available in any supermarket in small quantities but is rather expensive. I recommend searching on the internet to find a supplier that sells large quantities, that will save you a lot of money.
Workspace: When working with hand tools on tiny fossils you won't produce a lot of dust, but when working with larger fossils with a lot of matrix, a sandblaster or other power tools, you will need a workspace that is well equipped for the job. My space is limited so I have a versatile workspace that I can use for hand tools, prepping with power tools and sandblasting.
The workspace is about 80 cm wide and 60 cm deep. You will need that width to work comfortably. The openings for the arms are about 25 cm wide, that's wider than most commercial sold sand blast cabins because I need space to move around so I can reach every angle. The curtains behind the arm openings are made of old inner tubes of a bike. For the cover I used glass, although polycarbonate is a reasonable alternative.